Why and How to make in-engine gameplay trailers
Disclaimer: I’m talking about indie gameplay trailers here as opposed to cinematic trailers. I don’t know nuffin’ about making legit cinematic trailers, I’ll leave that to the pros.
Should you be reading this?
This tutorial / opinion piece is intended for devs who’ve released at least one or two games. If you’re earlier in your game development career, then your focus should really be on making games! The trailer is secondary, and a hand-made trailer will certainly do the trick. Likewise if you’re already proficient with video editing software and you’re happy with that workflow, then more power to you. This is a discussion for programmers working in a team too small to hire a video editor. That means you’ve had to make and maintain a couple of trailers in the past and perhaps you wish there was a better way. Enter in-engine trailers.
In-engine vs hand made
Simply put, an in-engine trailer is made in the same way that you make your game: in the game engine. But instead of launching your game, you launch a self-playing trailer and record the output.
Launching your game has a flow of control something like this:

Whereas an in-engine trailer’s flow is more like this:

Why would you want to do this? Well, if you’ve made trailers for a game before, then you know it can be pretty time consuming and also frustrating, since it feels like you’re using unfamiliar tools and you’re not making progress on your game itself. And as the game develops further, you find yourself re-recording and re-editing and re-exporting over and over. I’m proposing that this method saves you time in the long run, and you may find it’s a more fun way to make a trailer in the first place!
Here’s my latest in-engine trailer, give it a watch so you can see what kind of results to expect. I’m pretty happy with it! I think the main giveaway is that the cursor movement looks a bit unnatural, but that’s a tradeoff I’m willing to accept for the moment.
PROS & CONS OF IN-ENGINE TRAILERS
Pros:
- If you’re a programmer, you get to lean into that strength
- You don’t have to learn video editing software
- The trailer reflects exactly what your game is like
- Your trailer creation system uses the same version control and backup system as the rest of your project (I don’t back up the videos themselves, only the creation code)
- It’s easy to update your trailer as you change your game’s visuals and SFX
- It’s easy to rerecord the same trailer in different languages
- You never have to record yourself playing the game and get nervous about making a mistake or getting the timing wrong
Cons:
- There’s a sizeable up-front time investment
- You have to implement features that are included for free in video editing software (transitions, title text)
- Some features may be prohibitively difficult to replicate, depending on your knowledge level and the time you’re willing to invest (shaders, anyone?)
- It requires writing some trailer-specific code, which can clutter up the project and break encapsulation
- It’s a less visual workflow: there’s no video timeline to view, only code (I’d say that’s a pro but not everyone feels the same)
- It’s not ideal for every genre: I suspect mimicking player movement in an FPS would be difficult to make look good, which would be sadly misrepresentative of your gameplay
- If you end up working with a professional video editor, they’ll be all like “what the heck is this”
If you find yourself nodding along to the ‘pros’ and thinking “no worries!” to the ‘cons’, then let’s proceed with an outline of the workflow.
THE WORKFLOW
- Think up / write out the scenes you want in your trailer
- Whip up some code that runs one scene
- Launch and watch
- Edit the scene code as needed
- Commit and push
- Repeat steps 2-5 until you’ve done all the scenes and are happy with your trailer
- Use a screen recorder to capture the whole trailer in one go
- Edit out the beginning and end (the time between ‘press record’ and ‘trailer has started’, and the time between ‘trailer runner has exited’ and ‘press stop recording’)
Admittedly this final step is best achieved in video editing software, the beast we’re trying to avoid, but that’s fairly straightforward to learn. YouTube and VLC can both do an ok job, but I’ve found that cutting it in something like DaVinci is easiest. “But I was promised no video editing software!” you say? More on that later, first some examples.
EXAMPLE & LESSONS
For my first Steam release, Quest Giver, I used the in-engine approach. Yes, I went overboard with the trailer for my first decent-sized game, that’s how I know to advise other people not to! I’m happy with how it turned out, but it was time that you could argue would’ve been better spent polishing the game instead.
You can see the trailer on the Steam page: https://store.steampowered.com/app/2604920/Quest_Giver/
But hello, here’s a Quest Giver launch trailer on YouTube and the background and font are different, what gives? https://www.youtube.com/watch?v=4P2XGQq_PU4
Before:
After:
Shortly after launch I received a decent amount of feedback that the pixelated font was hard to read. Quest Giver is a story-driven game, AKA lots of reading, so I switched the default to a comfy sans-serif font. Also, I had been learning a bit about drawing with perspective so I redid the office background art to reflect that. Meanwhile the other half of DarZal Games, Zalinius, had added some fun sound effects to the game. Thanks to the trailer prep work I’d done, re-exporting the trailer with the new art, sounds, and font (in both French and English, mind you) was simple and I was very grateful to past-me.
SO HOW DO I CODE A VIDEO “SCENE”??
The idea here is to make the game play itself in real time.
Here’s a sample of my control flow for Messy Recipe, the game whose trailer I showed at the beginning of this article.
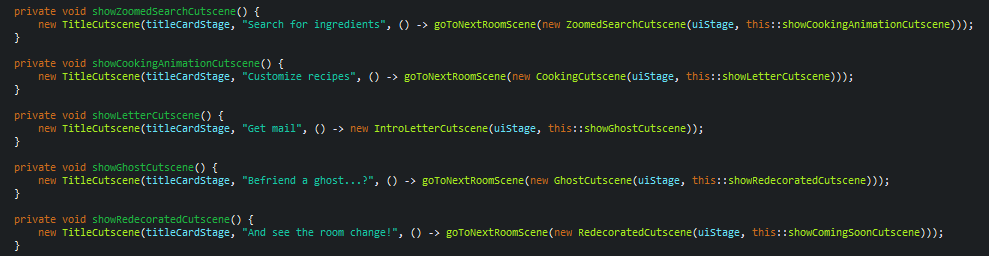
A TitleCutscene shows the supplied text on the titleCardStage (UI renderer layer), and after a set amount of time fades out then fades in the next room scene provided in its constructor.


Here, the title cutscene “Search for ingredients” transitions to the ZoomedSearchCutscene, which itself transitions to the cooking animation TitleCutscene, and so on and so forth.
Transitioning between scenes, this animation flow uses the same fade in/out system as the game itself, for example when transitioning between levels or returning to the main menu.
Le Cursor
One very important aspect of this is controlling the cursor. Game engines typically allow you to control the cursor as you see fit, which is useful for keeping it centered in the case of a first-person camera, and is otherwise not really recommended in gameplay. However, our trailer will be run entirely through programmatic cursor movements and clicks actually interacting with the in-game UI. You’ll need to use whatever timed-animation system your engine has to offer (Unity Coroutines, libGDX Actions, Godot Tweens) to move the mouse smoothly from one position to another, simulate a click down, wait a fraction of a second, then simulate a click up. And repeat to keep simulating game interactions. This means that while recording both the frames and the audio you must WALK AWAY from your computer– moving the cursor yourself interferes with the recording, and it’s a good excuse for a break anyway. Keyboard input can be similarly simulated if relevant to your game.
Trailer-Specific Code
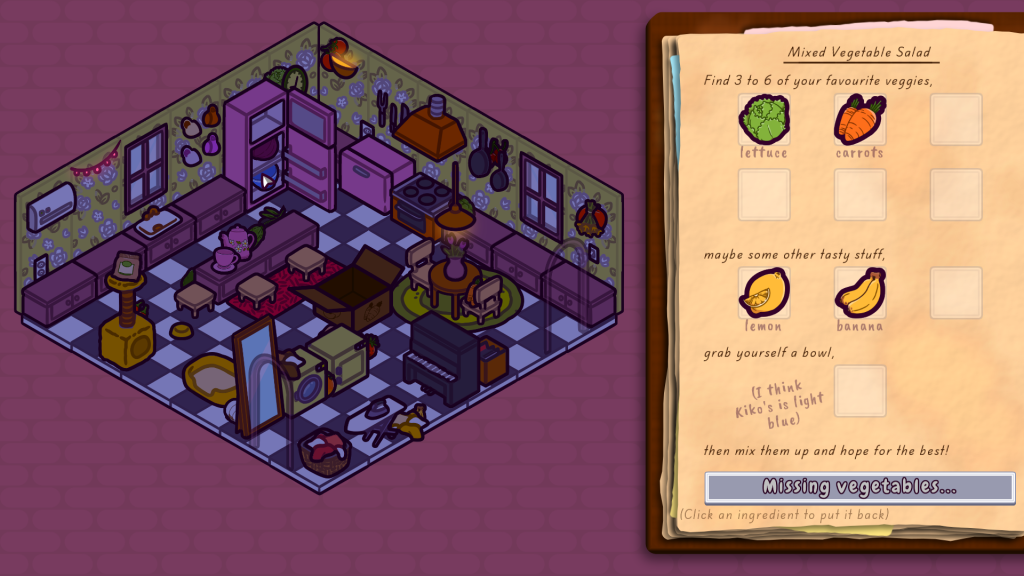
You’ll almost certainly need to set up some trailer-specific code. For example, in the ZoomedSearchCutscene image (above-right) the cursor is about to click on some spicy peppers. However, the hidden objects in the game are distributed randomly, and there’s a chance there won’t be anything hidden there at all! So, my trailer launcher calls some trailer-specific code on this scene to hide a head of lettuce in the fridge if there isn’t already something there. Some code will also likely be necessary to interrupt a scene with a fadeout according to your desired edit, and to clean up a scene once it’s over. You may also choose to hide some UI elements in particular scenes if they’re too much of a distraction.
OFF YOU GO
That should be all you need to get started on your trailer in your engine of choice. I wanted to share this technique because it’s not something I’ve ever seen people discuss, and I think there exists a subset of devs who’d really appreciate this workflow! When I started doing it for Quest Giver I was totally winging it, so I hope this article can provide some guidance to devs who want to try it for themselves.
One area I’d like to improve is the simulated cursor movement, since I’ve not found the perfect combination of interpolated movement animations to make it look convincingly natural. I’ve seen some gnarly university-research-level papers/libraries on making cursor movement look natural, but hey I’m busy making games here. An alternate avenue would be to record your real input (once) and feed that into the trailer engine: I suspect this could help with faster-paced gameplay or games with character controllers.
I’d love to hear if anyone is doing something similar, or has a different way to save time with trailers!
BONUS
If you set up this trailer system, then setting up a screenshot-taker for store assets can quickly be made the same way. Write up a “trailer” which sets the game up into the situations you want screenshots of, and then just take a screenshot! (Manually, or in-engine for bonus points)
Above is a gif of my screenshot taker in action, with output to the console on the frame each screenshot is taken. You can see that it’s taking the below screenshots for the Messy Recipe store page:

BUT WE CAN DO BETTER
Earlier I brought up the possibility of making the entire trailer in-engine, no video editing software whatsoever. This is the approach I developed while working on Messy Recipe. The ‘in-engine trailer with manual recording’ approach that I explained above is probably the best bang for your buck in terms of time investment, since this next part is a bit finicky. Only carry on if you’re a firm believer in doing a good amount of work now to save some unknown amount of time later, or if you want to uninstall DaVinci forever.
Without getting into engine specifics, here’s how you can do it all in one go:
- Code the trailer the same as above
- Set up a 2-pass recording system: first capture every individual frame of the trailer at a fixed 60 FPS as a screenshot (this pass will take a while, it takes much longer than 1/60th of a second to capture the screenshot), then record the trailer audio in the second pass (this pass is pretty much the same length as the trailer, the audio is much less data)
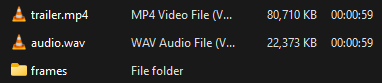
- Using FFmpeg, stitch together the trailer frames and audio into the final video
Capturing frames:
The first step of the frame capture program is to clear the directory where you’ll be outputting the images, that way if your trailer gets shorter there aren’t frames from the end of a previous export hanging around and accidentally getting baked in. Make sure your trailer/game is running at a fixed 60fps, or whatever framerate you want the trailer video to be, and at the final resolution you want (presumably 1920×1080 but I don’t judge). Then at the end of each render() call after drawing the game’s current frame, capture the current screen contents as a numbered screenshot. Pretty much every engine I’ve tried has a built-in way to do this, hopefully you’re good for that.
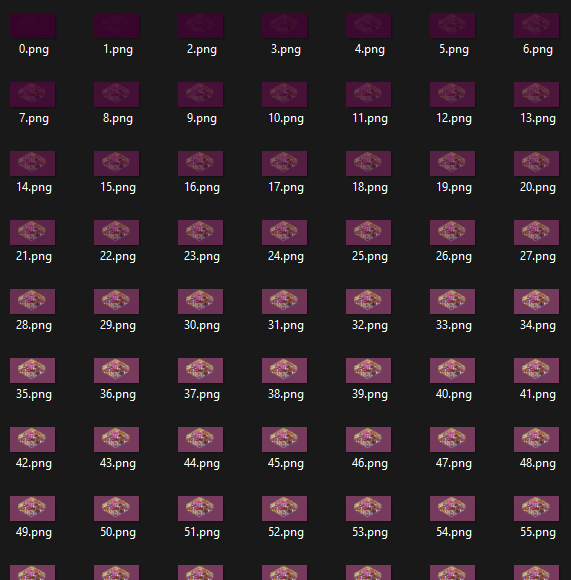
Here’s a peek at my frames output directory, you can see the first scene of the trailer fading in, with each frame png named one number higher than the last (as that’s the easiest way I found to feed them into FFmpeg when assembling the video).
Capturing Audio:
Similarly start by clearing the audio output directory. I used miniaudio as my game’s audio engine: you can attach an encoder node to the engine and it’ll record all audio to a .wav as it plays. I record the audio in a separate pass to the frames because the game rendering is forced to wait for each frame to finish outputting before starting the next frame, but the audio is on its own thread and keeps running smoothly. As a result the audio is too long if I record them together.
A word of warning: only attach the encoder once the trailer music actually starts, otherwise it’ll record silence while the trailer-game is loading (which will make the audio offset from the visuals by the duration of the loading process).
Merging Into Video:
Once everything’s exported, audio + frames = trailer, easy!
Well, not that easy. I’m no FFmpeg expert, and the Java code here for running it in a separate process is borrowing heavily from stack overflow and I don’t claim to understand every line. I’m eternally thankful that some kind souls out there made Java wrappers for FFmpeg and I was able to try a couple and find one I liked working with. This part can definitely be done on the command line if you’re comfortable with that (my String array is pretty clearly just the command line arguments) but I like having it all in a main() file where it’s easy to edit and re-run whenever I need. Plus I’m able to write a //comment after each argument, which is great since I have a 0% chance of remembering what they each mean otherwise.
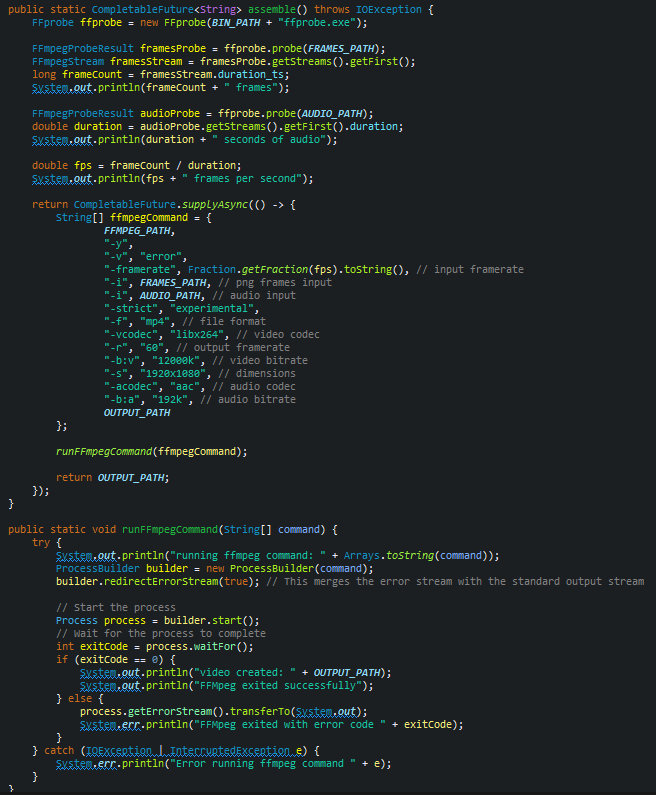
public static CompletableFuture<String> assemble() throws IOException {
		FFprobe ffprobe = new FFprobe(BIN_PATH + "ffprobe.exe");

		FFmpegProbeResult framesProbe = ffprobe.probe(FRAMES_PATH);
		FFmpegStream framesStream = framesProbe.getStreams().getFirst();
		long frameCount = framesStream.duration_ts;
		System.out.println(frameCount + " frames");

		FFmpegProbeResult audioProbe = ffprobe.probe(AUDIO_PATH);
		double duration = audioProbe.getStreams().getFirst().duration;
		System.out.println(duration + " seconds of audio");

		double fps = frameCount / duration;
		System.out.println(fps + " frames per second");

		return CompletableFuture.supplyAsync(() -> {
			String[] ffmpegCommand = {
					FFMPEG_PATH,
					"-y",
					"-v", "error",
					"-framerate", Fraction.getFraction(fps).toString(), // input framerate
					"-i", FRAMES_PATH, // png frames input
					"-i", AUDIO_PATH, // audio input
					"-strict", "experimental",
					"-f", "mp4", // file format
					"-vcodec", "libx264", // video codec
					"-r", "60", // output framerate
					"-b:v", "12000k", // video bitrate
					"-s", "1920x1080", // dimensions
					"-acodec", "aac", // audio codec
					"-b:a", "192k", // audio bitrate
					OUTPUT_PATH
			};

			runFFmpegCommand(ffmpegCommand);

			return OUTPUT_PATH;
		});
	}

	public static void runFFmpegCommand(String[] command) {
		try {
			System.out.println("running ffmpeg command: " + Arrays.toString(command));
			ProcessBuilder builder = new ProcessBuilder(command);
			builder.redirectErrorStream(true); // This merges the error stream with the standard output stream

			// Start the process
			Process process = builder.start();
			// Wait for the process to complete
			int exitCode = process.waitFor();
			if (exitCode == 0) {
				System.out.println("video created: " + OUTPUT_PATH);
				System.out.println("FFMpeg exited successfully");
			} else {
				process.getErrorStream().transferTo(System.out);
				System.err.println("FFMpeg exited with error code " + exitCode);
			}
		} catch (IOException | InterruptedException e) {
			System.err.println("Error running ffmpeg command " + e);
		}
	}
Here I start by using an FFmpeg probe to take a peek at the number of frames and the duration of the audio. This lets me calculate the expected FPS (60, or very close to that), and if that number is off then I know something went wrong with the frames or audio capture. From there it’s a reasonably straightforward call to FFmpeg to search my given frame + audio directories, and put them together into an .mp4 with the specified codices and bitrates. Your mileage may vary with these numbers, you’ve just got to try it for yourself and see if the quality is to your standards.
And that’s it! You now have a fully hands-off trailer exporting system, making it trivially easy to update and re-export your trailer as your game changes. I know that I can never go back to making hand-made trailers, and I’m glad I put the time into this. Some might say “when your only tool is a hammer, everything looks like a nail” aka “must you keep using programming to solve every problem” and to them I say “heck yeah!”. I like programming.
-Darzington